
TL;DR — The Settings That Matter Most
- Camera RAW Cache: Increase to 30-50GB on an SSD
- Smart Previews: Enable for editing (doesn't affect export quality)
- Catalog + Previews: Keep on SSD (your RAW files can stay on any drive)
- GPU: Set to Auto, keep drivers updated
- Windows 11: Disable Hardware-Accelerated GPU Scheduling (HAGS)
- DNG Conversion: Convert large RAW files at import for smaller sizes and faster reads
If Lightroom Classic feels sluggish, you're not alone. The good news? A few targeted tweaks can dramatically improve performance. This guide covers the settings that actually matter for Windows 11 users.
Storage Setup: The Biggest Performance Factor
Where you store your files matters more than almost any other setting. Here's the optimal setup:
| What | Where to Store It | Why It Matters |
|---|---|---|
| Catalog (.lrcat) | NVMe or SSD | Lightroom reads this constantly |
| Previews (.lrpreviews) | Same drive as catalog | Accessed every time you browse |
| Camera RAW Cache | SSD | Caches your Develop edits |
| RAW Photos | Any drive (HDD is fine) | Minimal performance impact |
The surprising truth: Testing shows that storing RAW files on an SSD provides no measurable speed improvement in the Develop module. Your catalog, previews, and cache location are what actually affect performance. Save your SSD space for what matters.
Keep 20% free space on any drive storing your catalog or cache. Full drives slow everything down.
Camera RAW Cache: The Easy Win
Increase Your Cache Size Easy Win
This is the single easiest optimization you can make. Adobe sets the default cache size to just 1GB to accommodate minimum-spec machines. For most photographers, this is way too small.
How to fix it:
- Go to
Edit > Preferences > Performance - Find "Camera Raw Cache Settings"
- Set Maximum Size to 30-50GB
- Make sure the location is on an SSD
The Camera RAW cache stores processed image data so Lightroom doesn't have to re-render every time you revisit a photo in Develop. A larger cache means more images stay "warm" and ready.
Smart Previews: Faster Develop Module
Edit with Smart Previews Big Impact
Smart Previews are smaller, lossy DNG files that Lightroom can use instead of your full RAW files while editing. The result? A noticeably snappier Develop module.
Set it up:
- Go to
Edit > Preferences > Performance - Check "Use Smart Previews instead of Originals for image editing"
- Build Smart Previews on import (check the option in the Import dialog)
Important: This doesn't affect export quality. Lightroom still uses your original RAW files when exporting. You're only using Smart Previews for the editing interface.
You can also build Smart Previews for existing images: select photos in Library, then Library > Previews > Build Smart Previews.
Preview Settings
Match Preview Size to Your Monitor
- Go to
Edit > Catalog Settings > File Handling - Set Standard Preview Size to match your monitor resolution (or slightly larger)
- Set Preview Quality to Medium (High rarely provides visible benefit)
Building 1:1 previews takes time but makes zooming instant. Build them overnight for large imports:
Managing Your Previews & Caches
Audit What's Actually on Disk Important
Before tweaking settings, check how much space your Lightroom files are actually using. Bloated previews are one of the most common causes of a full catalog drive.
Find Your Catalog Folder
Go to Edit > Catalog Settings > General. The path to your catalog is listed at the top. Click Show to open the folder in Explorer.
What to Look For
Inside your catalog folder, you'll see several files. Here's what's normal and what's not:
- .lrcat (your catalog database) — typically 500MB–2GB, even for large catalogs. If it's significantly larger, run
File > Optimize Catalog. - Previews.lrdata / .lrpreviews (standard + 1:1 previews) — this is the one that gets out of hand. 10–20GB is normal. Over 30–40GB means 1:1 previews are piling up and never being discarded.
- Smart Previews.lrdata — usually 1–3GB per 10,000 images. Manageable unless you've built Smart Previews for your entire catalog.
- Camera RAW Cache — lives in a separate location (check
Edit > Preferences > Performanceto see the path and configured size limit). Compare the actual folder size to your limit—if they match, the cache is full and working as intended.
Auto-Discard 1:1 Previews
This is the single most impactful setting for preventing disk bloat. Go to Edit > Catalog Settings > File Handling and set Automatically Discard 1:1 Previews to After 30 Days (or "After 1 Week" if you're tight on space).
Without this, every 1:1 preview you've ever built stays on disk forever. After a year of weddings, that can easily hit 50–100GB.
Red flags: Preview file over 30–40GB, or your catalog drive under 20% free space. Both will cause sluggish performance. Discard old 1:1 previews and check the auto-discard setting above.
Know Your Caches (And When to Clear Them) Important
Lightroom uses several different caches. When things get sluggish or weird, clearing the right one can fix it.
Camera RAW Cache
Stores processed RAW data so the Develop module doesn't have to re-render images from scratch. This is the cache you want to be large (30-50GB).
When to clear: Corrupted previews, color issues, or unexplained Develop module slowness.
How: Edit > Preferences > Performance > Purge Cache
Preview Cache (.lrpreviews file)
Contains Standard, 1:1, and Smart Previews for browsing in Library. Lives next to your catalog file and can grow massive over time.
When to clear: Catalog feels bloated, previews look wrong, or you want to reclaim disk space.
How: Library > Previews > Discard 1:1 Previews (safest). Or delete the .lrpreviews file entirely when Lightroom is closed—it'll rebuild what it needs.
Video Cache
Caches rendered video frames. Only matters if you work with video in Lightroom.
When to clear: Video playback issues or reclaiming space.
How: Edit > Preferences > Performance > Purge Video Cache
Pro tip: If Lightroom is acting strange after an update or crash, purging the Camera RAW cache is a good first troubleshooting step. It forces Lightroom to rebuild everything fresh.
GPU Acceleration Settings
Lightroom Classic uses your graphics card to accelerate the Develop module, AI features (Select Subject, Select Sky), and as of 2025, preview generation.
Configure Your GPU
Where to configure: Edit > Preferences > Performance > Use Graphics Processor
Options:
- Auto — Let Lightroom decide (works for most users)
- Custom — Manual control over Basic vs. Full acceleration
- Off — Disable GPU (only if troubleshooting issues)
Minimum requirements:
- DirectX 12 compatible GPU
- 2GB VRAM (4GB+ recommended for 4K displays)
- 8GB VRAM for full GPU acceleration
For Laptops with Dual GPUs
If you have both integrated and dedicated graphics (common on gaming/creator laptops), force Lightroom to use the dedicated GPU:
NVIDIA Configuration
- Right-click desktop → NVIDIA Control Panel
- Manage 3D Settings → Program Settings
- Add
Lightroom.exe - Set to "High-performance NVIDIA processor"
AMD Configuration
- Right-click desktop → AMD Software
- Gaming → Graphics
- Add Lightroom and set to "High Performance"
Keep drivers updated. NVIDIA and AMD frequently release driver updates with optimizations for creative apps. Check for updates monthly.
Windows 11 Specific Optimizations
Windows 11 introduces some quirks that can impact Lightroom. Here's what to check:
Disable Unnecessary NVIDIA Background Processes Win11
Some users report up to 50% performance improvement after disabling NVIDIA background services:
- Open Task Manager (
Ctrl+Shift+Esc) - Go to Startup apps tab
- Disable NVIDIA-related items you don't need (battery boost, telemetry, etc.)
- Restart
Disable Hardware-Accelerated GPU Scheduling Win11 Big Impact
Hardware-Accelerated GPU Scheduling (HAGS) is a Windows 11 feature that lets your GPU manage its own VRAM and task scheduling instead of Windows handling it. For gaming, this can reduce latency. For Lightroom Classic, it creates a conflict that can tank performance.
The problem: Lightroom has a known VRAM memory leak, and HAGS makes it significantly worse. With HAGS enabled, Lightroom will gradually consume all available VRAM during extended editing sessions—especially when using AI masking (Select Subject, Select Sky), AI Denoise, and heavy Develop module work. Eventually the system crawls, sliders lag, and you're force-quitting the app.
This hits hardest if you're editing high-megapixel files from cameras like the Sony A7R series, Canon R5, or Nikon Z8/Z9, where the larger RAW files chew through VRAM faster.
The fix:
- Open Settings → System → Display → Graphics
- Expand "Advanced graphics settings"
- Toggle OFF "Hardware-accelerated GPU scheduling"
- Restart your PC
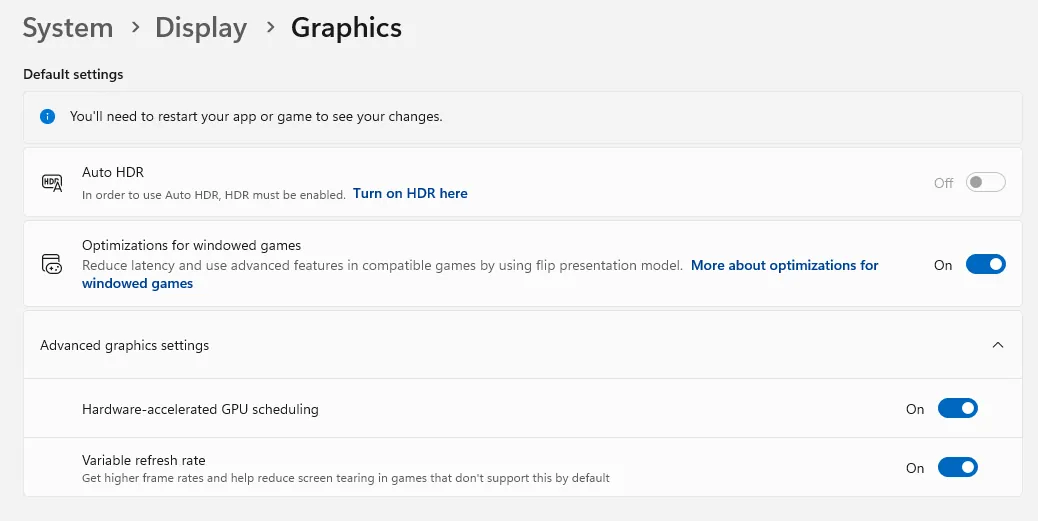
Keep Lightroom's own GPU acceleration ON. This fix is about how Windows schedules GPU tasks, not about disabling the GPU entirely. In Lightroom, leave Preferences → Performance → Use Graphics Processor set to Auto or Custom with "Use GPU for display" enabled.
A note on newer hardware: This advice is most relevant for older systems and previous-generation GPUs where the VRAM leak hits hardest. If you're running a current-gen card (RTX 40-series, RX 7000-series, or newer), disabling HAGS may actually hurt performance since modern GPUs are designed to take advantage of it. Test with HAGS on and off to see what works best for your setup.
This is one of the most well-documented Lightroom performance issues across Adobe Community forums and photography communities, with reports going back to when Windows 11 first shipped. If you've noticed Lightroom getting progressively slower the longer you edit, HAGS is likely a contributing factor.
Reduce Windows Search Indexing Win11
Lightroom's catalog journal, preview cache, and Camera Raw cache generate thousands of small file changes per session. Both Windows Search and Everything try to keep up with these changes, consuming disk I/O that competes with Lightroom — especially during imports, 1:1 preview generation, and batch exports.
Option 1: Disable Windows Search Entirely
If you already use Everything for file search, there's no reason to keep Windows Search running in the background.
- Press
Win+R, typeservices.msc, press Enter - Find Windows Search in the list and double-click it
- Set Startup type to Disabled
- Click Stop to end it immediately, then click OK
- Reclaim disk space by deleting the old index at
C:\ProgramData\Microsoft\Search\Data(can be several GB)
Heads up: This disables Start Menu search and Outlook desktop search. If you rely on those, go to Settings → Privacy & Security → Searching Windows and switch to Classic mode instead — it limits indexing to your user folders only, which is a good middle ground.
Option 2: Configure Everything Search Exclusions
Everything uses NTFS journal monitoring to track file changes with very low overhead — but it still reacts to every write Lightroom makes. Excluding Lightroom's high-churn folders keeps Everything fast without losing search coverage where it matters.
- In Everything, go to Tools → Options → Indexes → Exclude
- Add these folders to the exclude list:
- Your catalog folder (the .lrcat and .lrcat-journal files change constantly)
- Previews.lrdata folder (thousands of small .lrprev files)
- Smart Previews.lrdata folder (if you use Smart Previews)
- Camera Raw cache — default location:
C:\Users\[username]\AppData\Local\Adobe\CameraRaw\Cache - Any temp or scratch disk folders you've configured
- Click Force Rescan after adding exclusions
Don't exclude your photo folders — those change infrequently and you'll want to be able to search them.
Stick to Stable Windows 11 Builds Important
If you're enrolled in the Windows Insider Program running Dev, Canary, or Beta builds—stop. These preview builds are for testing, not production work. They frequently introduce bugs, driver incompatibilities, and performance regressions that can tank Lightroom performance.
Known issues with Insider builds:
- Thread scheduling problems — Preview builds often have experimental changes to how Windows manages CPU threads, which can cause inconsistent performance and stuttering in Lightroom
- GPU driver conflicts — NVIDIA and AMD drivers are optimized for stable Windows releases; Insider builds can break GPU acceleration entirely
- Memory management bugs — Beta builds have been known to cause memory leaks and excessive RAM usage that compounds over time
- Background process issues — New Windows features in preview can spawn additional background tasks that compete with Lightroom for resources
Check your build:
- Press
Win+R, typewinver, press Enter - Look at your Windows version
If you see "Dev Channel," "Canary Channel," or "Beta Channel" anywhere, you're on a preview build.
Switch back to stable:
- Go to Settings → Windows Update → Windows Insider Program
- Select "Stop getting preview builds"
- You may need to wait for a stable release to catch up, or do a clean install
Your editing machine should be boring and stable. Save the bleeding-edge stuff for a test PC.
RAM: How Much Do You Actually Need?
Adobe recommends 12GB minimum, but more helps with:
- Import/export speed
- HDR and Panorama merging
- Quickly moving between photos in Loupe view
- Running other apps alongside Lightroom
Practical recommendation: 16GB is comfortable for most workflows. 32GB if you frequently merge large panoramas or keep many apps open.
Catalog Maintenance
Monthly: Optimize Your Catalog
This defragments your catalog database and can improve responsiveness, especially for large catalogs.
Catalog Size
Some suggest keeping catalogs under 10,000 images, but many professionals run catalogs with 100,000+ images successfully. If your catalog is well-maintained and on an SSD, size alone shouldn't be a bottleneck.
Recent Updates
Recent Lightroom Classic updates include performance-relevant changes:
- GPU Preview Generation (August 2025): Previews can now be generated using your GPU, significantly speeding up import.
- Improved XMP Auto-Write (v14.4, June 2025): Now writes every 10 seconds instead of after each edit. You can safely enable
Edit > Catalog Settings > Metadata > Automatically write changes into XMPwithout performance penalty. - Current Version: Lightroom Classic 15.1 (December 2025)
Rob's Tips
Disable E-Cores on Intel Hybrid CPUs Advanced
If you're running a 12th gen Intel processor or newer (Alder Lake, Raptor Lake, etc.), your CPU has two types of cores: P-cores (Performance) and E-cores (Efficiency). Windows 11's thread scheduler tries to be smart about which tasks go where, but Lightroom doesn't always play nice with this hybrid architecture.
The result? Lightroom can feel inconsistent—sometimes snappy, sometimes sluggish—as threads bounce between fast and slow cores.
The fix: Disable E-cores entirely and let Lightroom use only your P-cores.
Option 1: BIOS (System-Wide)
- Restart your PC and enter BIOS/UEFI (usually
DelorF2during boot) - Find your CPU configuration settings (location varies by motherboard)
- Look for "E-cores" or "Efficient Cores" and disable them
- Save and exit
Option 2: Task Manager (Quick & Temporary)
- Open Task Manager (
Ctrl+Shift+Esc) - Go to Details tab, find
Lightroom.exe - Right-click → Set affinity
- Uncheck the E-cores (typically the higher-numbered CPUs)
This only lasts until you close Lightroom—you'll need to redo it each session.
Option 3: Process Lasso (Set It and Forget It)
Process Lasso lets you save CPU affinity rules permanently. Set Lightroom to only use P-cores once, and it applies automatically every time you launch. This is the best of both worlds—E-cores stay available for other apps, but Lightroom always gets your fastest cores.
Trade-off: Disabling E-cores system-wide (BIOS method) reduces multi-tasking efficiency. The Task Manager and Process Lasso methods are more surgical—only Lightroom is affected, and other apps can still use your E-cores.
This tweak forces all Lightroom threads onto your fastest cores, eliminating the inconsistency caused by hybrid scheduling. Many photographers with hybrid Intel CPUs report noticeably smoother slider response and faster culling after making this change.
Convert RAW Files to DNG at Import Easy Win
If you're shooting with a high-megapixel camera—Sony A7R series, Canon R5, Nikon Z8/Z9—your RAW files are massive. A single Sony ARW from an A7RV is 80-120MB. That adds up fast when Lightroom is reading thousands of them.
DNG (Digital Negative) is Adobe's open RAW format. Converting to DNG applies lossless compression that shrinks file sizes by 15-25% with zero quality loss. Smaller files mean faster disk reads, quicker imports, and snappier browsing.
Enable at import: In the Import dialog, look at the top bar and change "Add" or "Copy" to Copy as DNG. That's it—every imported photo gets converted automatically.
Convert existing files: Select photos in Library, then Library > Convert Photos to DNG. Check "Delete originals after successful conversion" to reclaim space.
Who benefits most: Photographers with 45MP+ cameras will see the biggest difference. If you're shooting 24MP files that are already 25-30MB each, the savings are smaller but still worth it for the format consistency.
If Lightroom Works in Safe Mode But Not Normally Advanced
This indicates third-party software interference. Do a clean boot:
- Press
Win+R, typemsconfig, press Enter - Services tab → Check "Hide all Microsoft services" → Disable all
- Startup tab → Open Task Manager → Disable all startup items
- Restart and test Lightroom
- Re-enable items one by one to find the culprit
Common offenders: RGB lighting software, audio enhancement tools, "gaming optimization" utilities.
Reset Lightroom Preferences (Nuclear Option) Advanced
Resetting Lightroom's preferences file can fix a surprising range of issues: random crashes, UI glitches, tools not responding, modules freezing, and unexplained slowness that persists after other troubleshooting. It's a good early step when things just feel "off" and you can't pinpoint why.
Method 1: Keyboard Shortcut (Easiest)
- Close Lightroom completely
- Hold
Shift + Altand click to launch Lightroom - Keep holding until you see the confirmation dialog
- Click "Reset Preferences"
Method 2: Hidden In-App Button
In recent versions, go to Edit > Preferences > General, then hold Alt. A hidden "Reset all Preferences and Relaunch" button appears. Click it.
Method 3: Manual File Rename (Recommended)
This is the safest approach because you can restore the file if resetting doesn't help.
- Close Lightroom
- Navigate to
%appdata%\Adobe\Lightroom\Preferences\(paste this in the Windows Run dialog or Explorer address bar) - Find
Lightroom Classic CC 7 Preferences.agprefs - Rename it to something like
Lightroom Classic CC 7 Preferences.agprefs.backup - Launch Lightroom—it creates a fresh preferences file automatically
If the reset didn't help, close Lightroom, delete the new file, and rename your backup back to restore your original settings.
What You Lose (And What You Don't)
Reset: All Preferences dialog settings, View Options, FTP server details, plugin preferences, and interface customizations.
Untouched: Your catalog, photos, Develop edits, collections, presets, and export presets. Nothing happens to your actual work.
You'll need to reconfigure: GPU settings, cache size and location, external editor preferences, and any other customizations. Take screenshots of your Preferences panels before doing this.
Gotcha — presets may disappear: If you had "Store presets with this catalog" enabled in Preferences, your presets will appear missing after reset. They're still there—just re-enable that checkbox in Preferences > Presets and they'll reappear.
Quick Reference: Settings Checklist
Before Your Next Session
- Camera RAW Cache: 30-50GB on SSD
- Smart Previews: Enabled for editing
- GPU: Set to Auto (or Custom for full acceleration)
- Catalog & Previews: On SSD/NVMe
- Standard Preview Size: Matches monitor resolution
- Check preview & cache file sizes (discard old 1:1 previews)
- Free disk space: 20%+ on catalog drive
- Hardware-Accelerated GPU Scheduling: OFF (Windows 11)
- DNG conversion: Enabled at import (especially for 45MP+ cameras)
- NVIDIA background processes: Disabled unnecessary ones
- Graphics drivers: Updated
- Monthly catalog optimization: Scheduled
Sources
Last updated: March 2026